Installing a linear drain shower can add a sleek and modern touch to your bathroom. However, the installation process can seem daunting if you're unfamiliar with plumbing and construction. This tutorial will guide you through the steps to successfully install your new linear drain shower.
Gather all necessary tools and materials.
Before beginning your linear drain shower installation, gathering all the necessary tools and materials is essential. This will ensure you have everything you need on hand and won’t have to stop in the middle of the installation to purchase something. Some tools and materials you’ll need include a saw, drill, level, waterproofing membrane, and the linear drain itself. Read through the installation instructions provided by the manufacturer to ensure you have all the necessary items.
Once you have all the necessary tools and materials, it’s time to begin the installation process. Start by measuring and marking the location of the linear drain on the shower floor. Use a saw to cut the necessary hole for the drain. Next, install the waterproofing membrane, overlapping the edges and corners to ensure a watertight seal. Then, install the linear drain according to the manufacturer’s instructions, ensuring it is level and securely fastened. Finally, test the drain to ensure it is functioning correctly before finishing the rest of the shower installation. With these steps, you’ll have a sleek and functional linear drain shower in no time.
Plan and measure the shower area.
The first step in installing a linear drain shower is to plan and measure the shower area. This will help you determine the size and placement of the drain, as well as the amount of waterproofing membrane and tile needed. Use a level to ensure the shower floor slopes towards the drain, allowing water to flow correctly. Measure the length and width of the shower area, and mark the location of the drain on the floor. Double-check your measurements to ensure accuracy before moving on to the next step.
Install the waterproofing membrane.
Once you have measured and planned the shower area, it’s time to install the waterproofing membrane. This is a crucial step in ensuring that water does not leak through the shower floor and cause damage to the subfloor or surrounding areas. Apply the membrane according to the manufacturer’s instructions, covering the entire shower area and any seams or corners. Allow the membrane to dry completely before moving on to the next step.
Install the linear drain base.
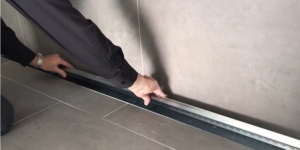
Once the waterproofing membrane is dry, installing the linear drain base is time. Start by placing the base in the shower area’s center, ensuring it is level. Use a level to check that the base is even on all sides. Then, mark the location of the drain on the membrane. Use a utility knife to cut a hole in the membrane where the drain will be located. Place the drain into the hole, ensuring it is flush with the surface of the membrane. Secure the drain in place according to the manufacturer’s instructions.
Connect the drain to the plumbing.
Once the linear drain base is securely in place, it’s time to connect it to the plumbing. This step will vary depending on the drain and plumbing setup, so follow the manufacturer’s instructions carefully. Using a coupling or connector, you must attach the drain to the waste pipe. Make sure the connection is tight and secure to prevent any leaks. Test the drain by pouring water into the shower area and checking that it flows smoothly into the drain and out of the waste pipe. Once you have confirmed that everything is working correctly, you can move on to the final steps of the installation process.
For more detailed information, please visit Lauxes Drains or Lauxes Drain’s detailed installation guide page.